A Complete Guide to Using Notion’s New Layouts Feature
Notion's new Layouts feature provides enhanced control over how you display information within database pages, making it easier to organize and navigate content. Whether you're managing projects, tracking tasks, or storing client information, Layouts allows you to customize the appearance of database entries with modules and a variety of organizational tools. This guide covers how to access and use Layouts, explains each customization feature, and shows you how to make the most of this powerful tool.
1. How to Access the Layouts Builder
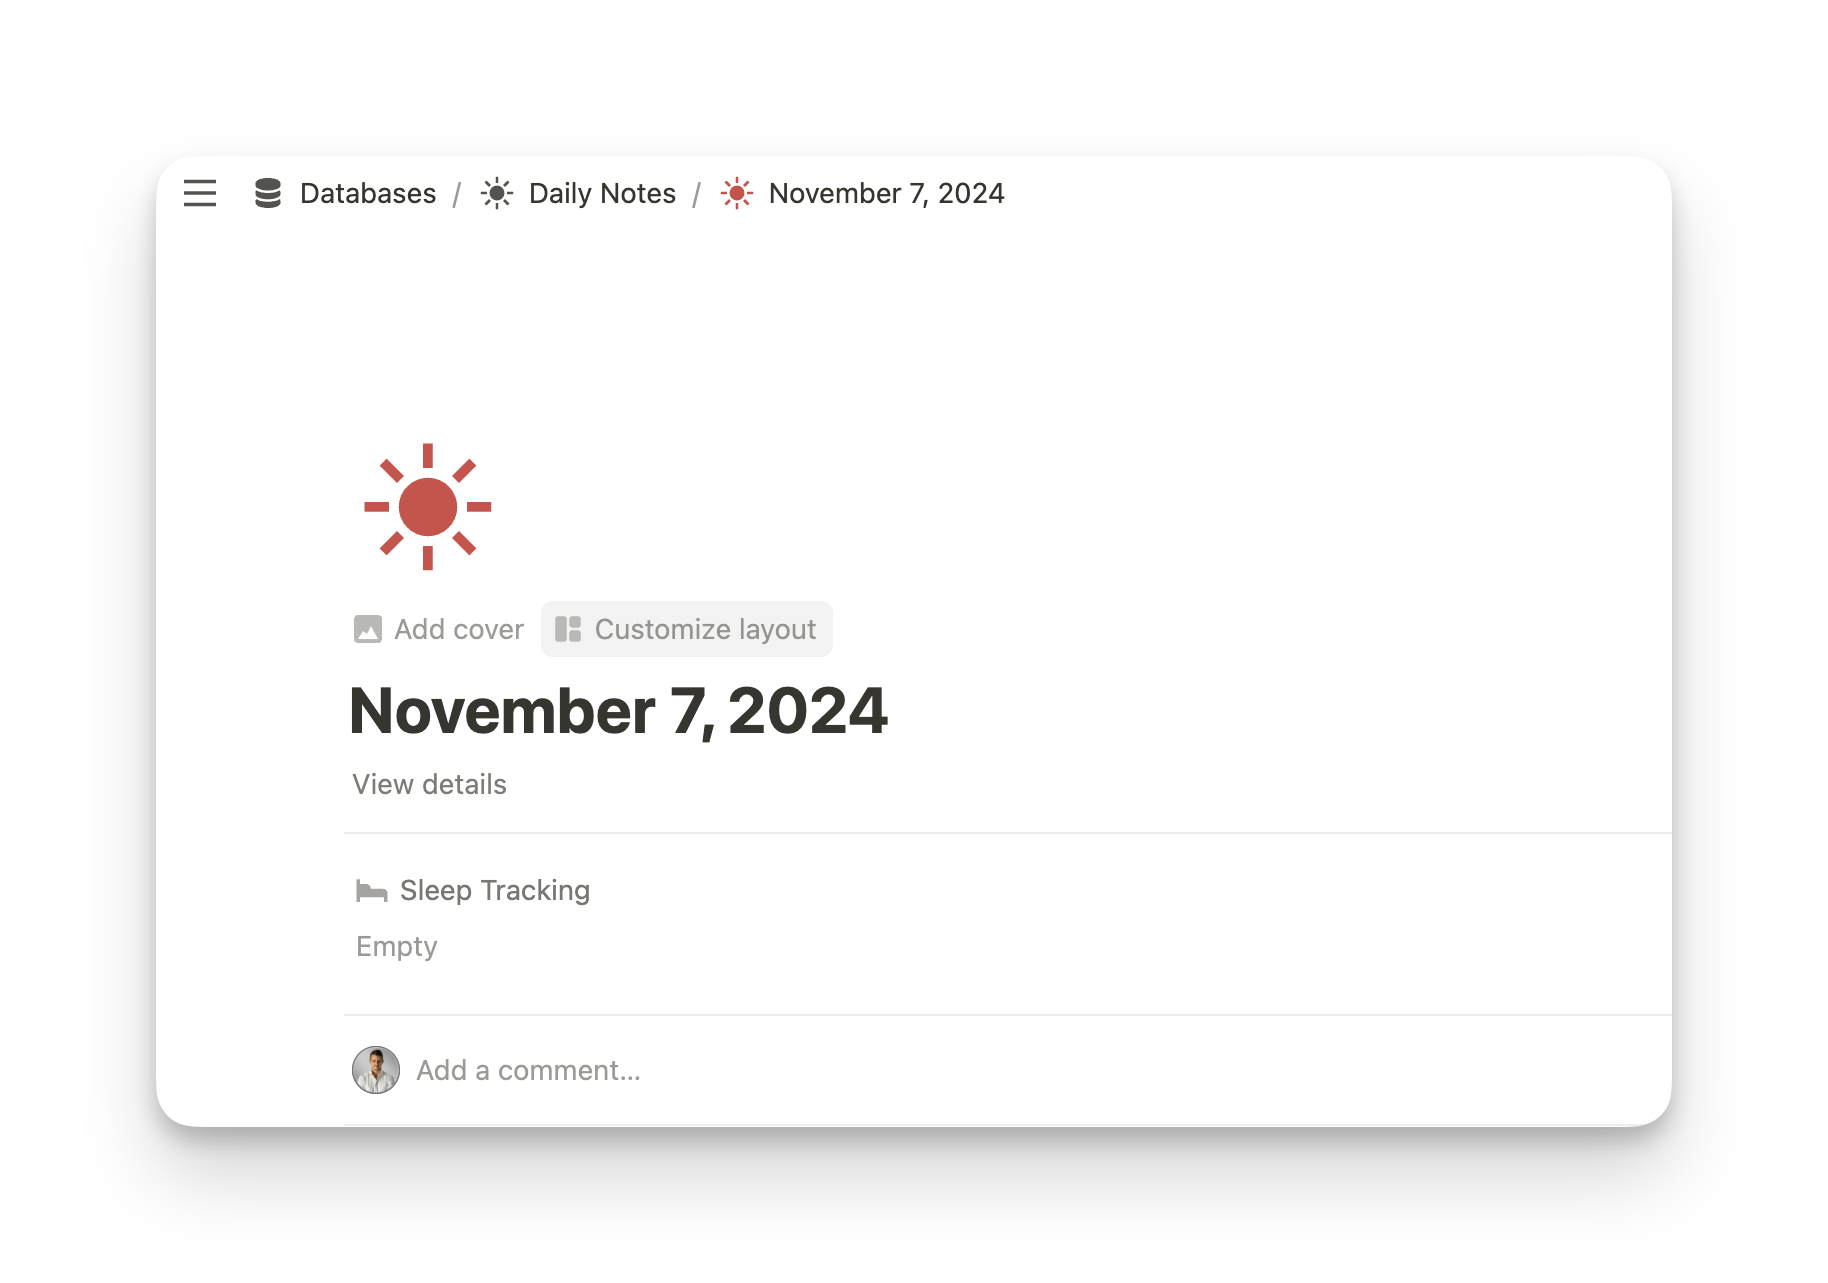
There are two ways to access the Layouts builder within a Notion database entry:
- Above the Title Button: Open any database entry and look for the Layout option above the title area. Click this to open the Layout builder.
- Three Dots Menu: Open any database page, click on the three dots in the top-right corner, and select Customize Layout to launch the builder.
With Layouts open, you’re ready to start customizing your page’s appearance and functionality.
2. Layout Settings
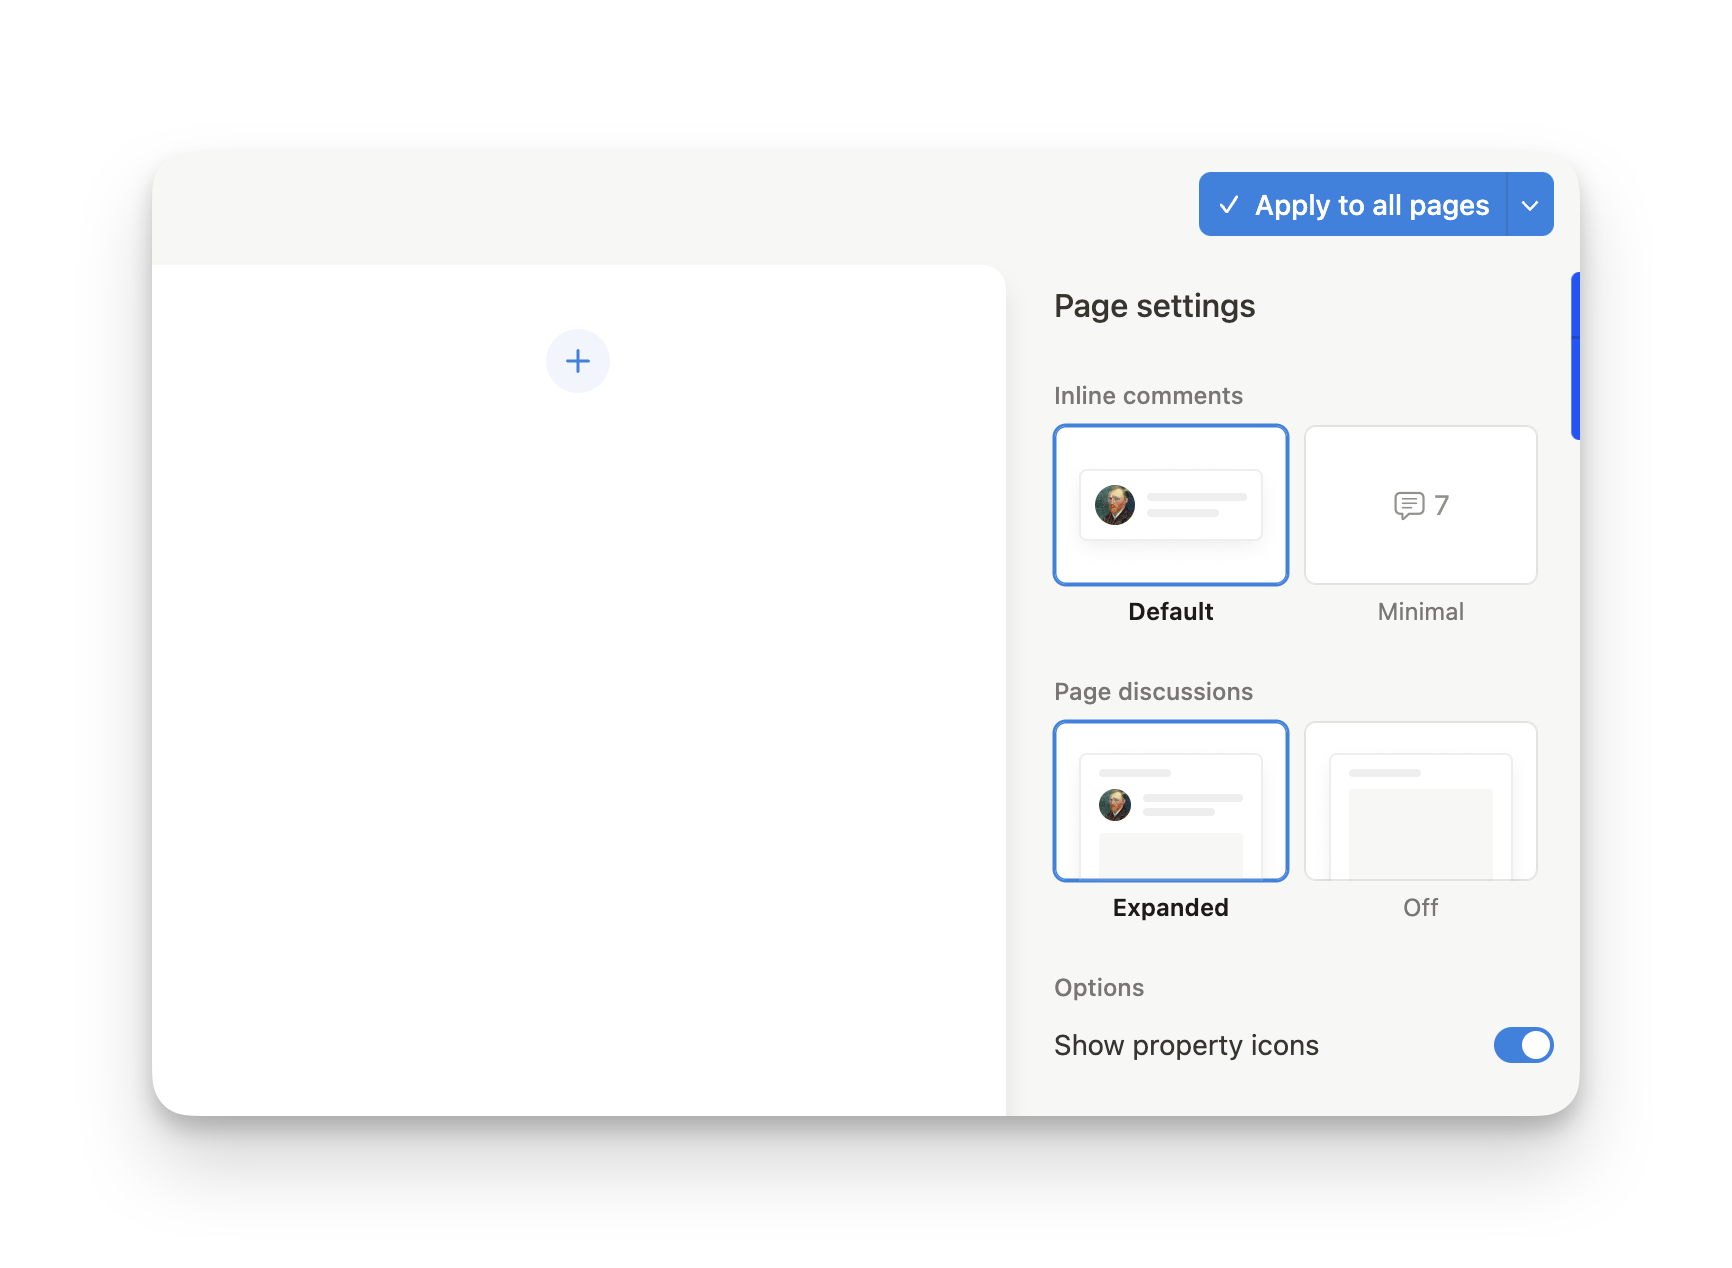
Once you’ve opened the Layouts builder, you’ll notice a Settings icon at the top of the page. Clicking this icon allows you to customize additional layout elements, including:
- Inline Comments View: Toggle whether comments are displayed inline within the page.
- Page Discussion: Show or hide the discussion section, making it easy to track ongoing conversations or feedback.
- Show/Hide Icons: Control the visibility of icons to keep the page clean and organized or to display them for quick recognition.
These options help personalize the user interface for a cleaner or more interactive experience, depending on your workflow needs.
3. Understanding Modules
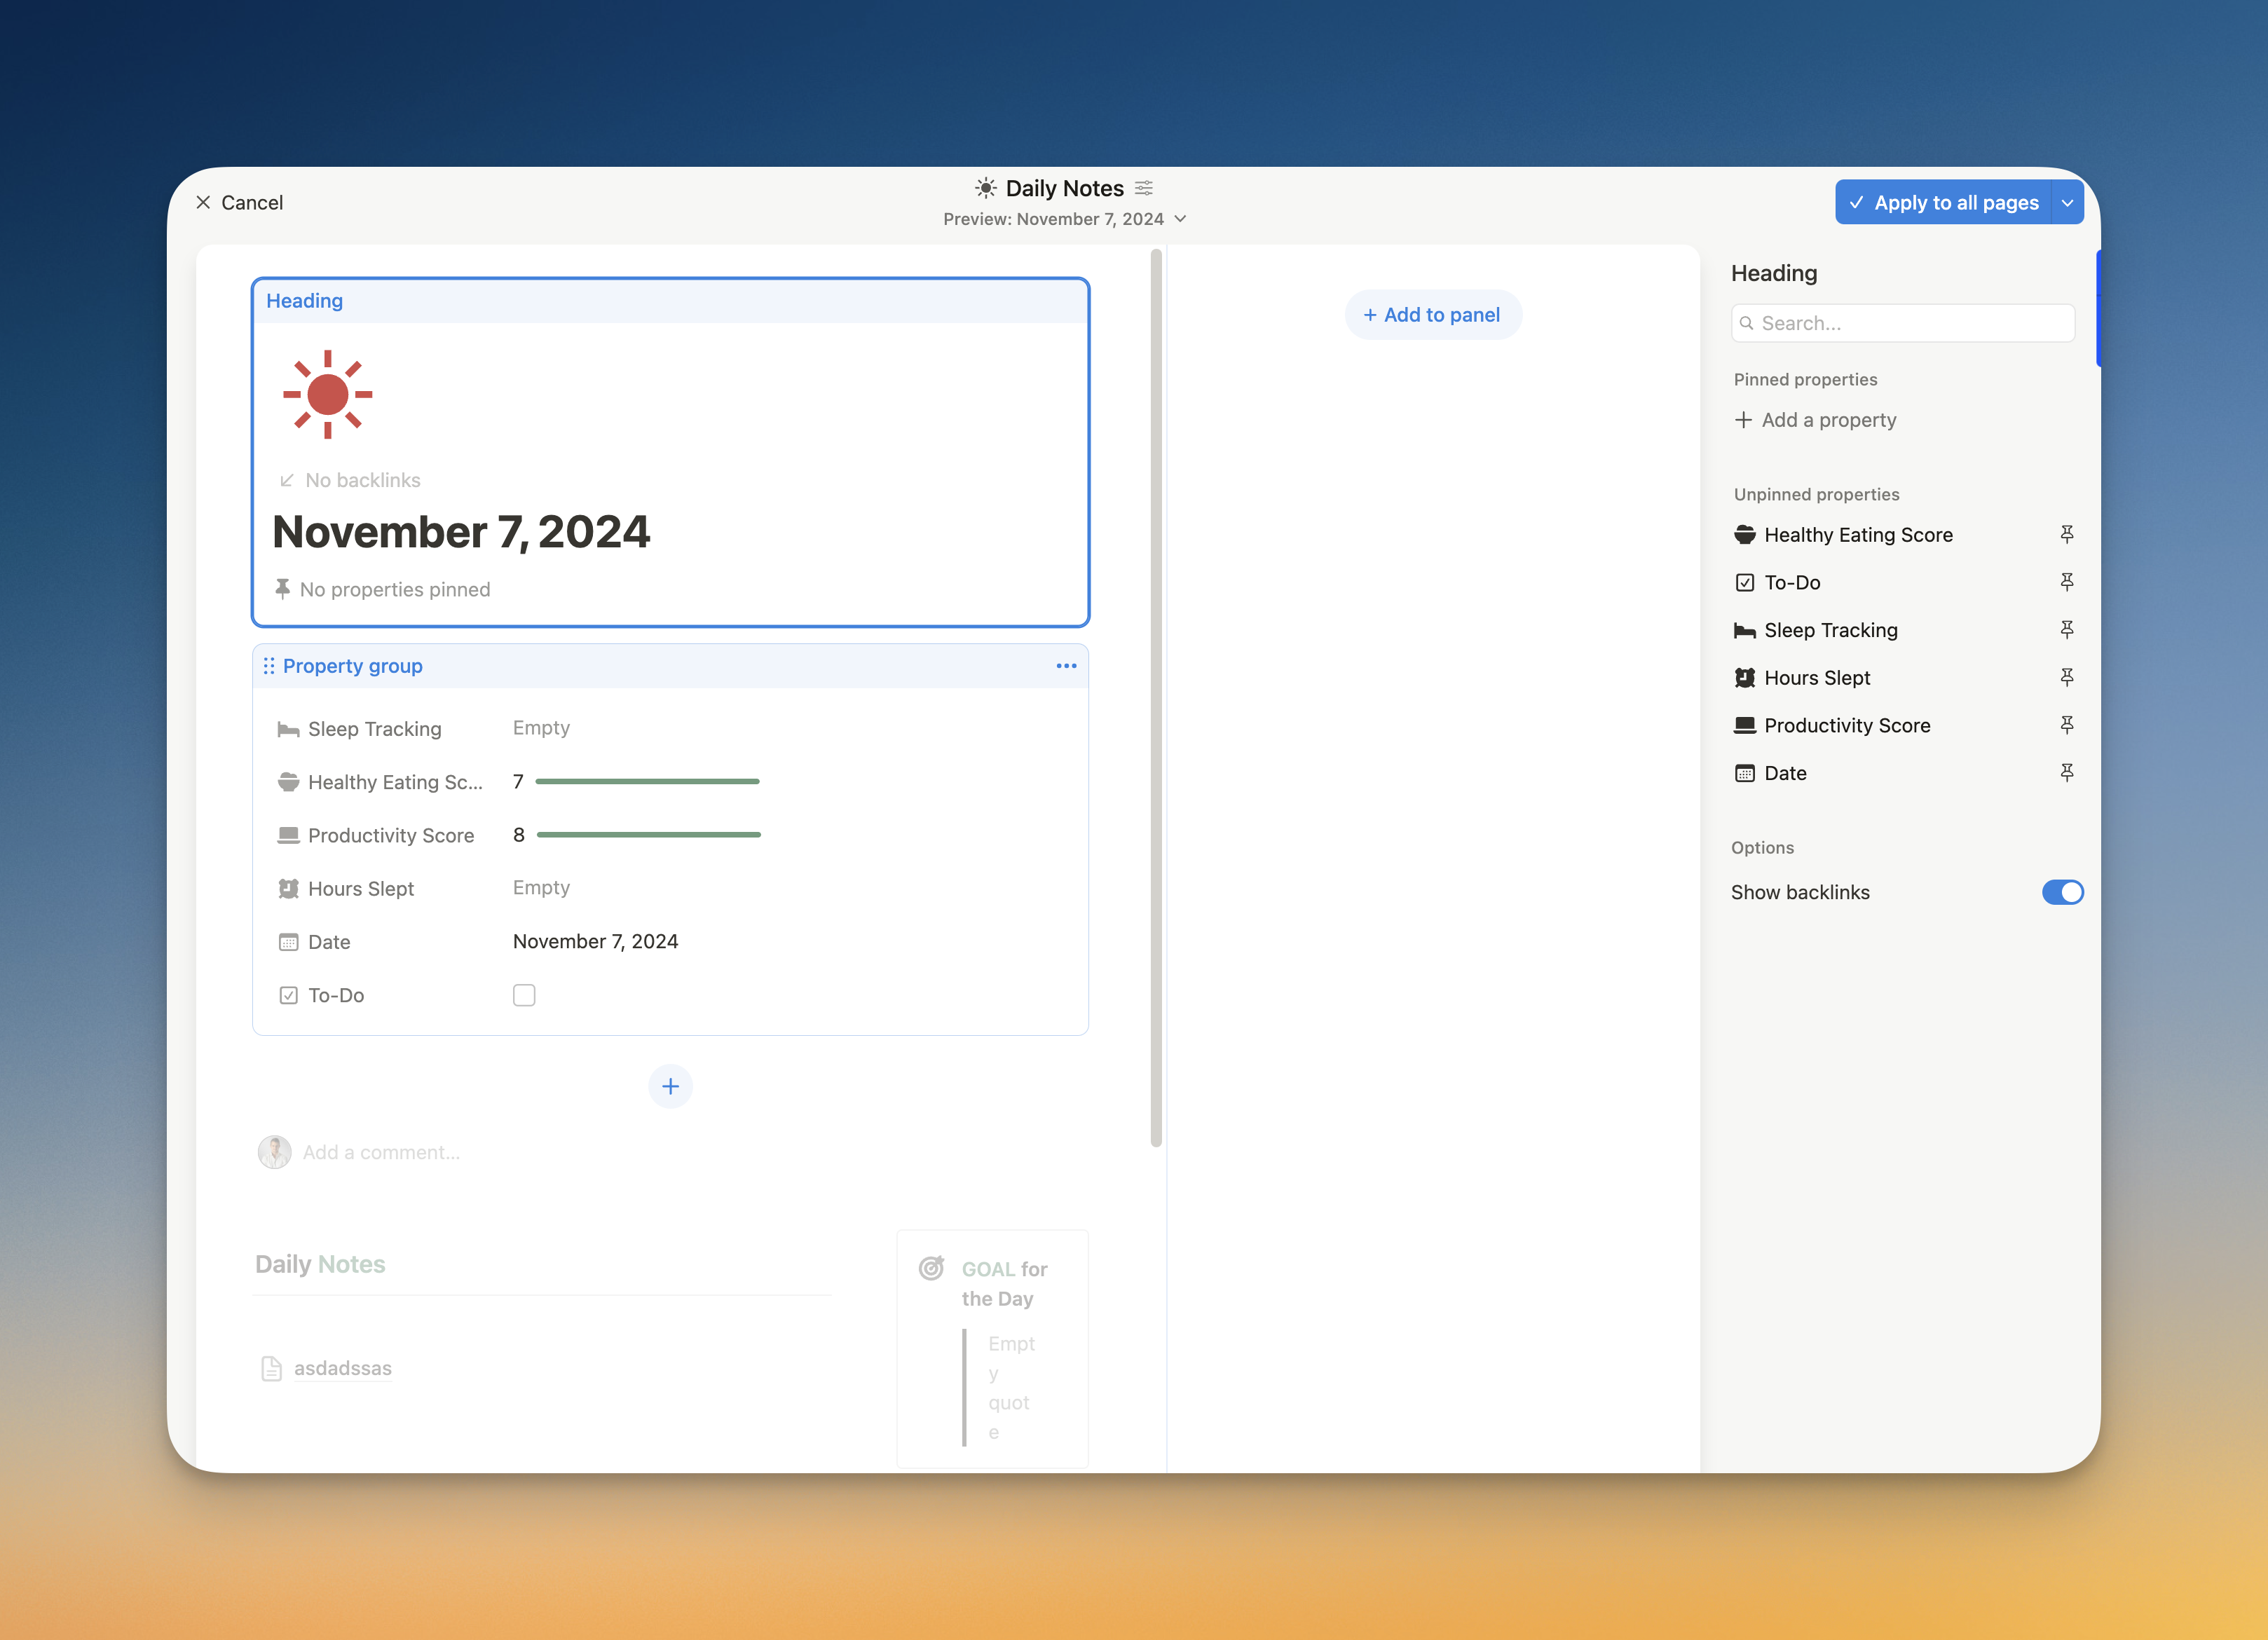
In Notion’s Layouts, the page is organized into modules, which you can arrange and modify to suit your content. Each module functions as a section that can contain properties, details, or headings.
The two primary modules you’ll start with are:
- Headings: Used for page titles, section titles, or brief descriptions.
- Property Groups: Collections of database properties (e.g., tags, due dates) that can be categorized or grouped for clearer navigation.
Modules can be rearranged or moved between sections, allowing for flexible, intuitive layouts that prioritize your most important information.
4. The Panel
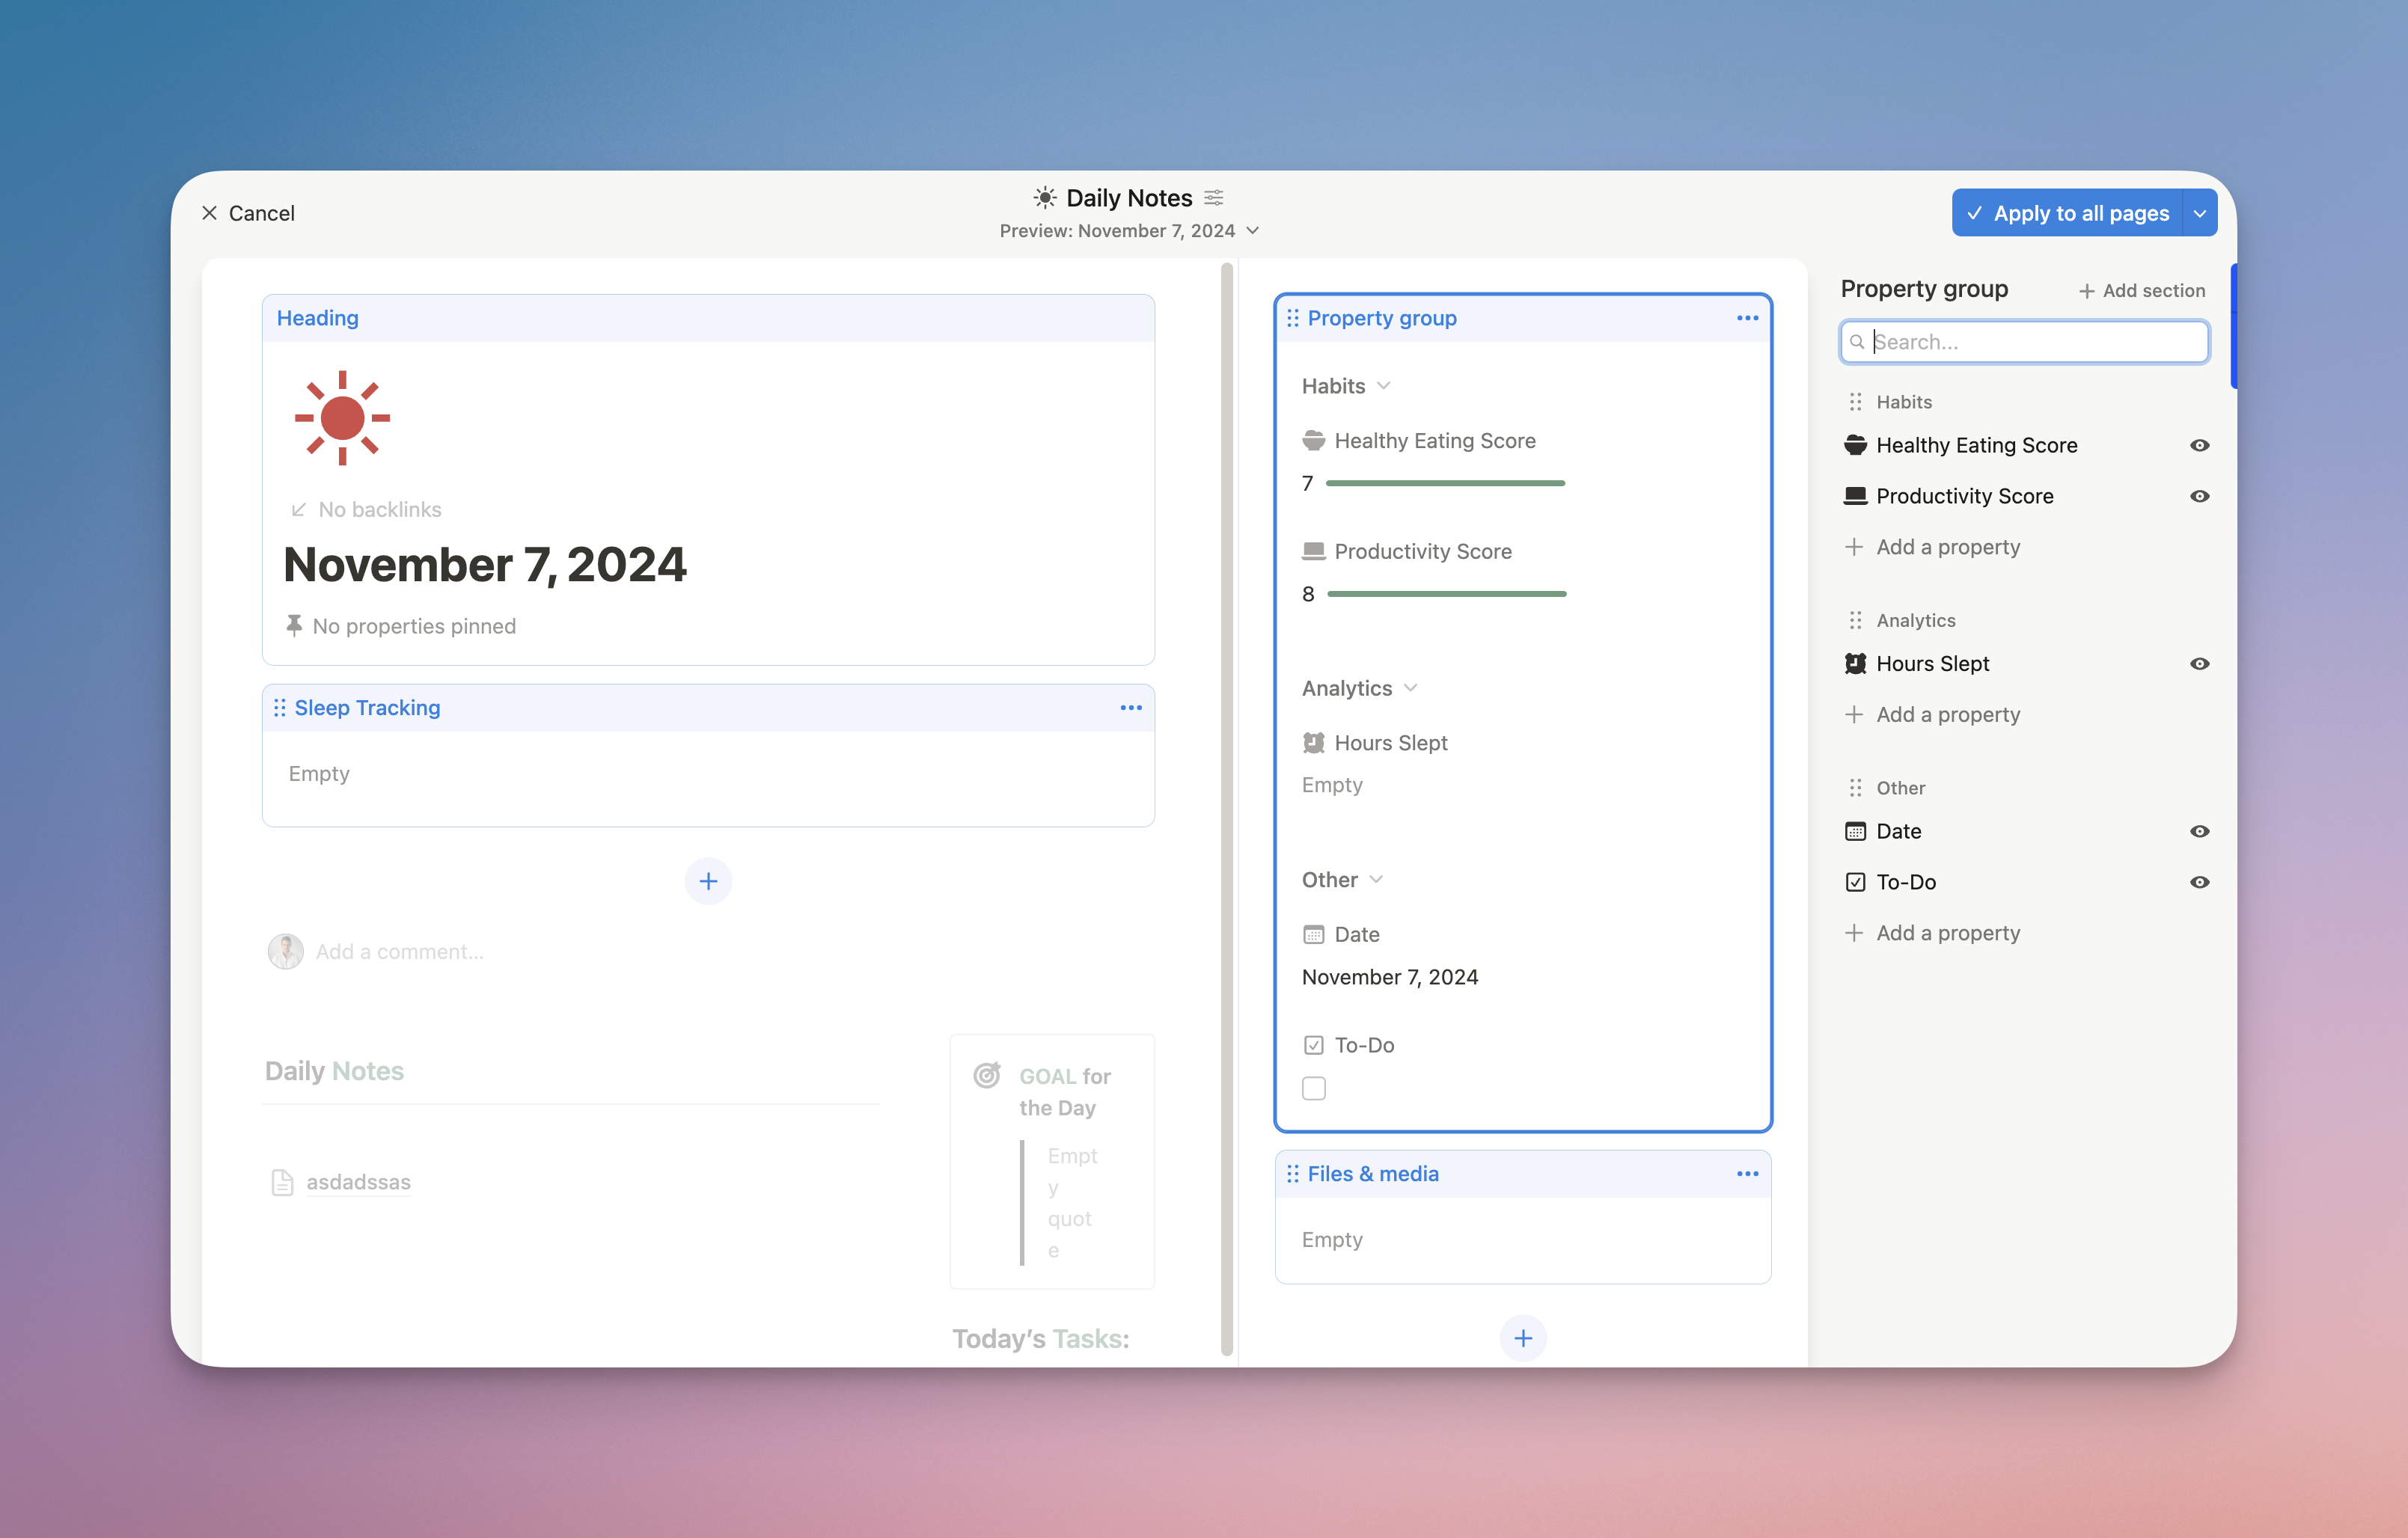
The Panel is a collapsible sidebar in Layouts that can store less critical properties, allowing you to access them without cluttering the main view. Here’s how the panel works:
Drag and Drop: Move properties or even entire modules to the panel. They’ll be hidden by default but can be opened whenever you need them.
Access on Demand: The panel acts as a hidden drawer, so information is out of sight but readily available with a click. You can simply access the panel by clicking on "View Details" under the title, or on the upper right corner.
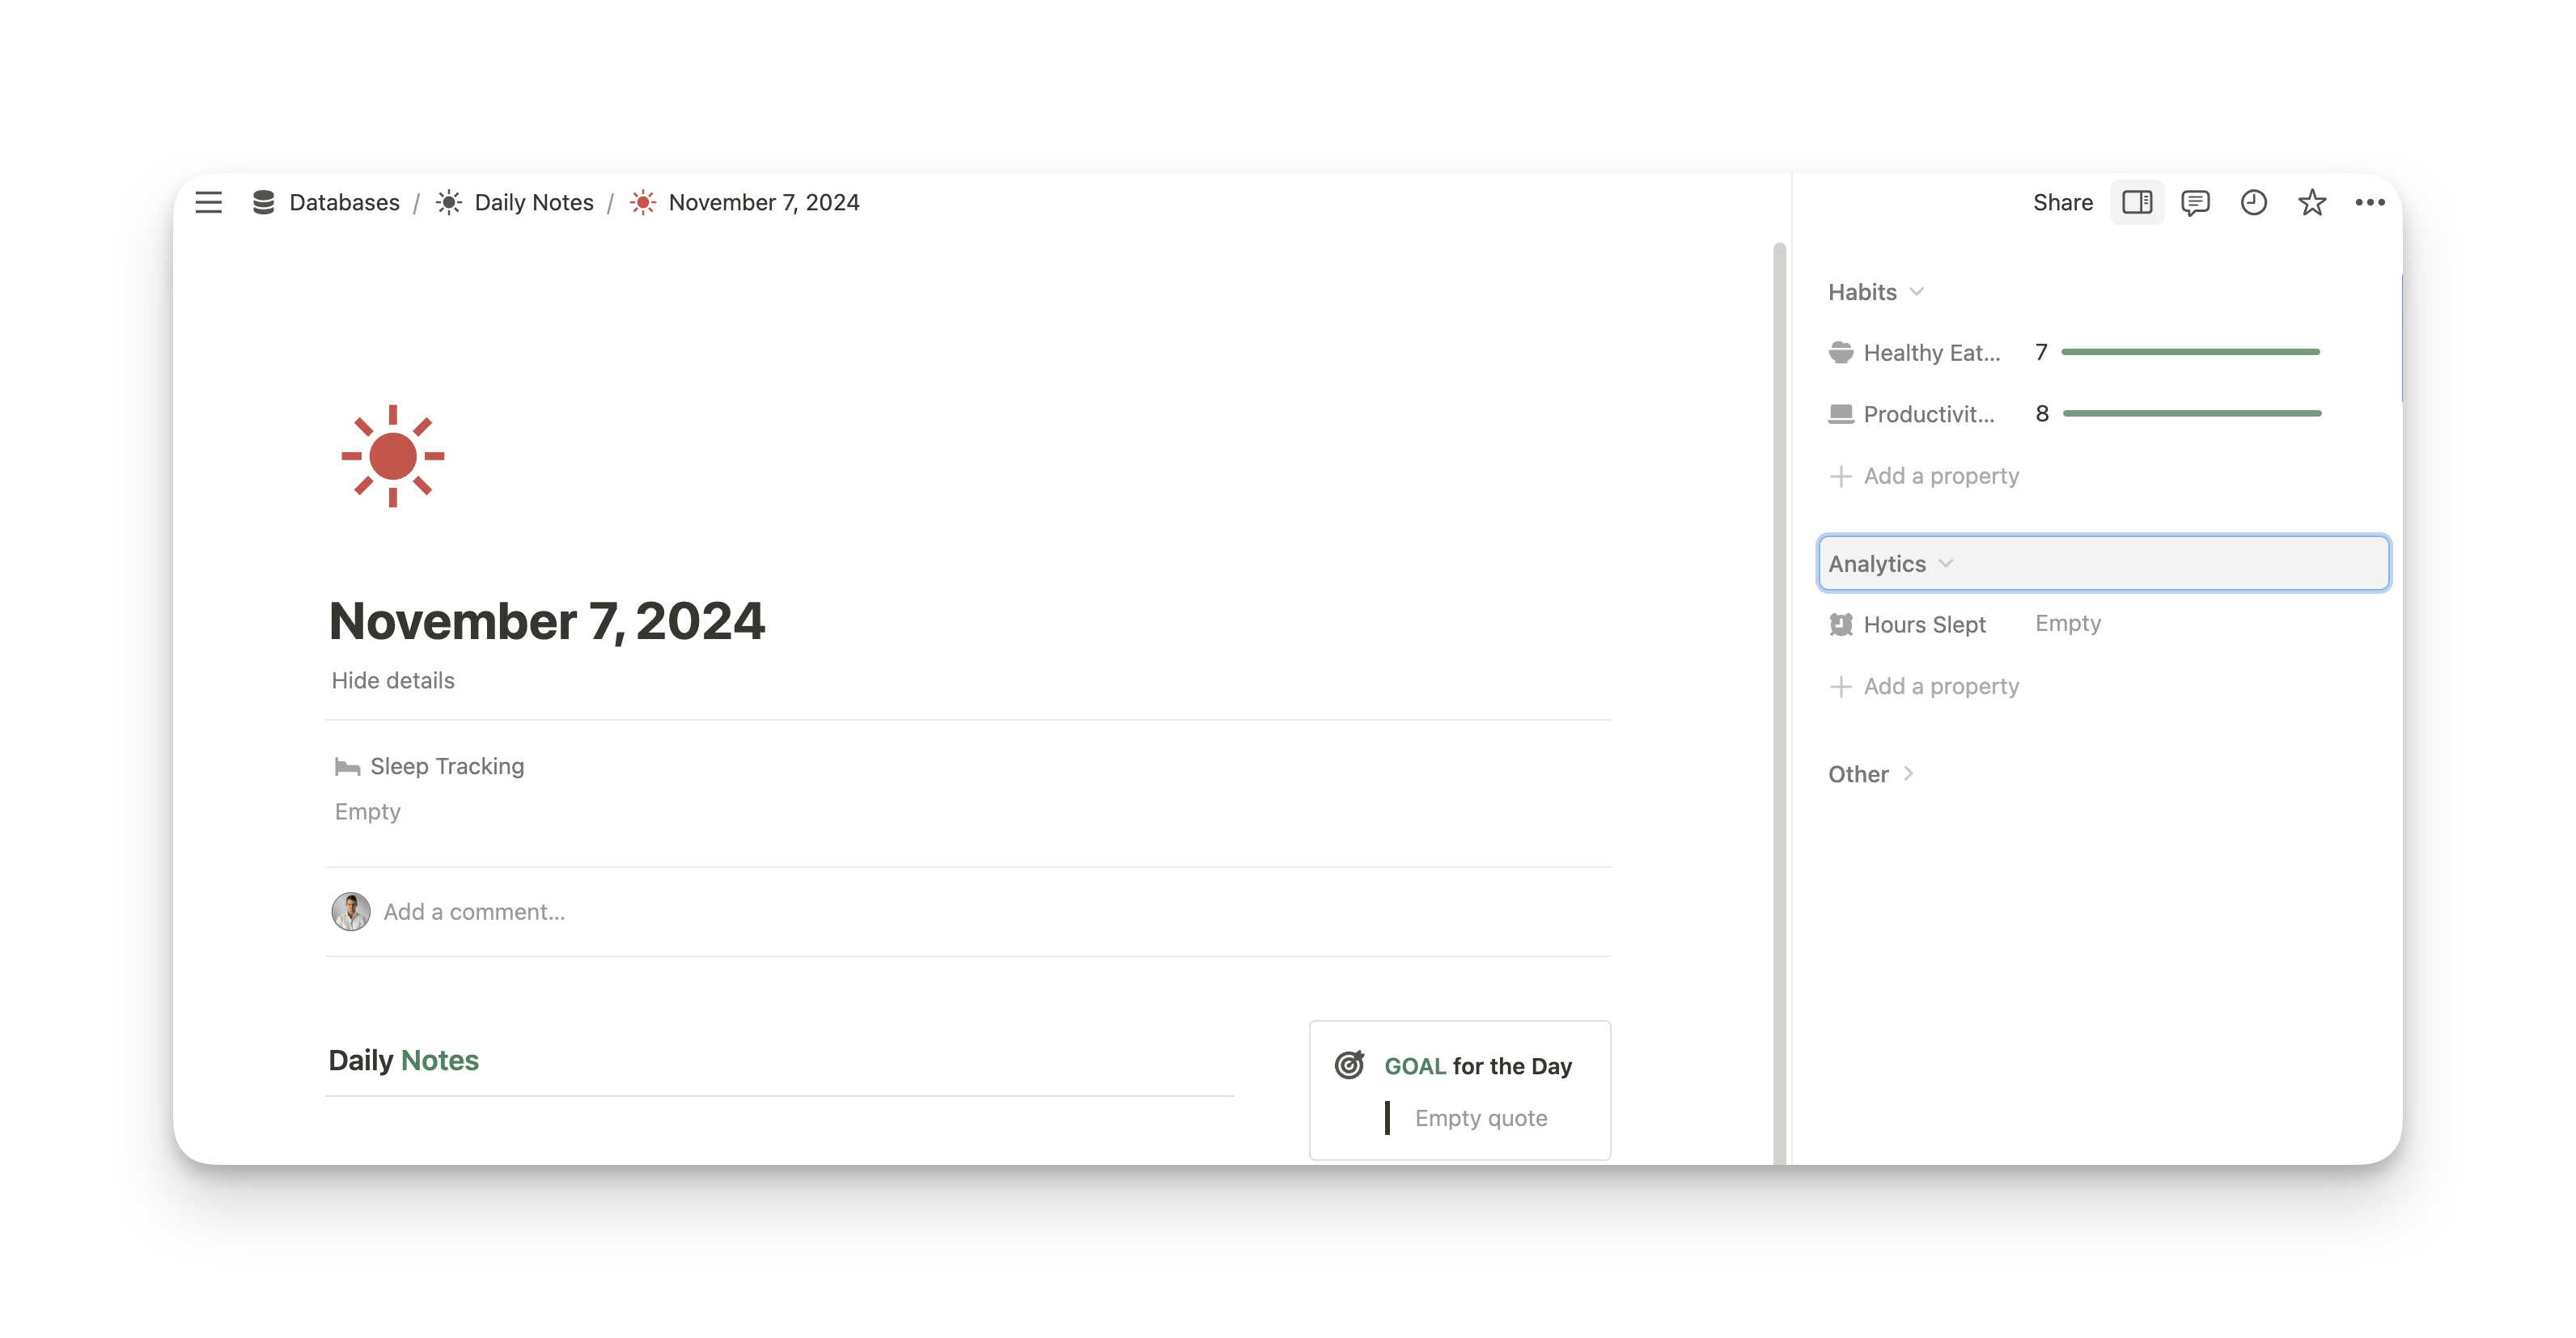
The panel is ideal for properties you reference occasionally or for sections that need to stay accessible without being immediately visible.
5. What You Can Do in Layouts
Notion's Layouts feature offers extensive customization options to help you organize your database entries in a way that maximizes clarity and efficiency. Here’s a breakdown of what you can do within Layouts to take full control over how your data is presented:
5.1 Pin Properties to the Header
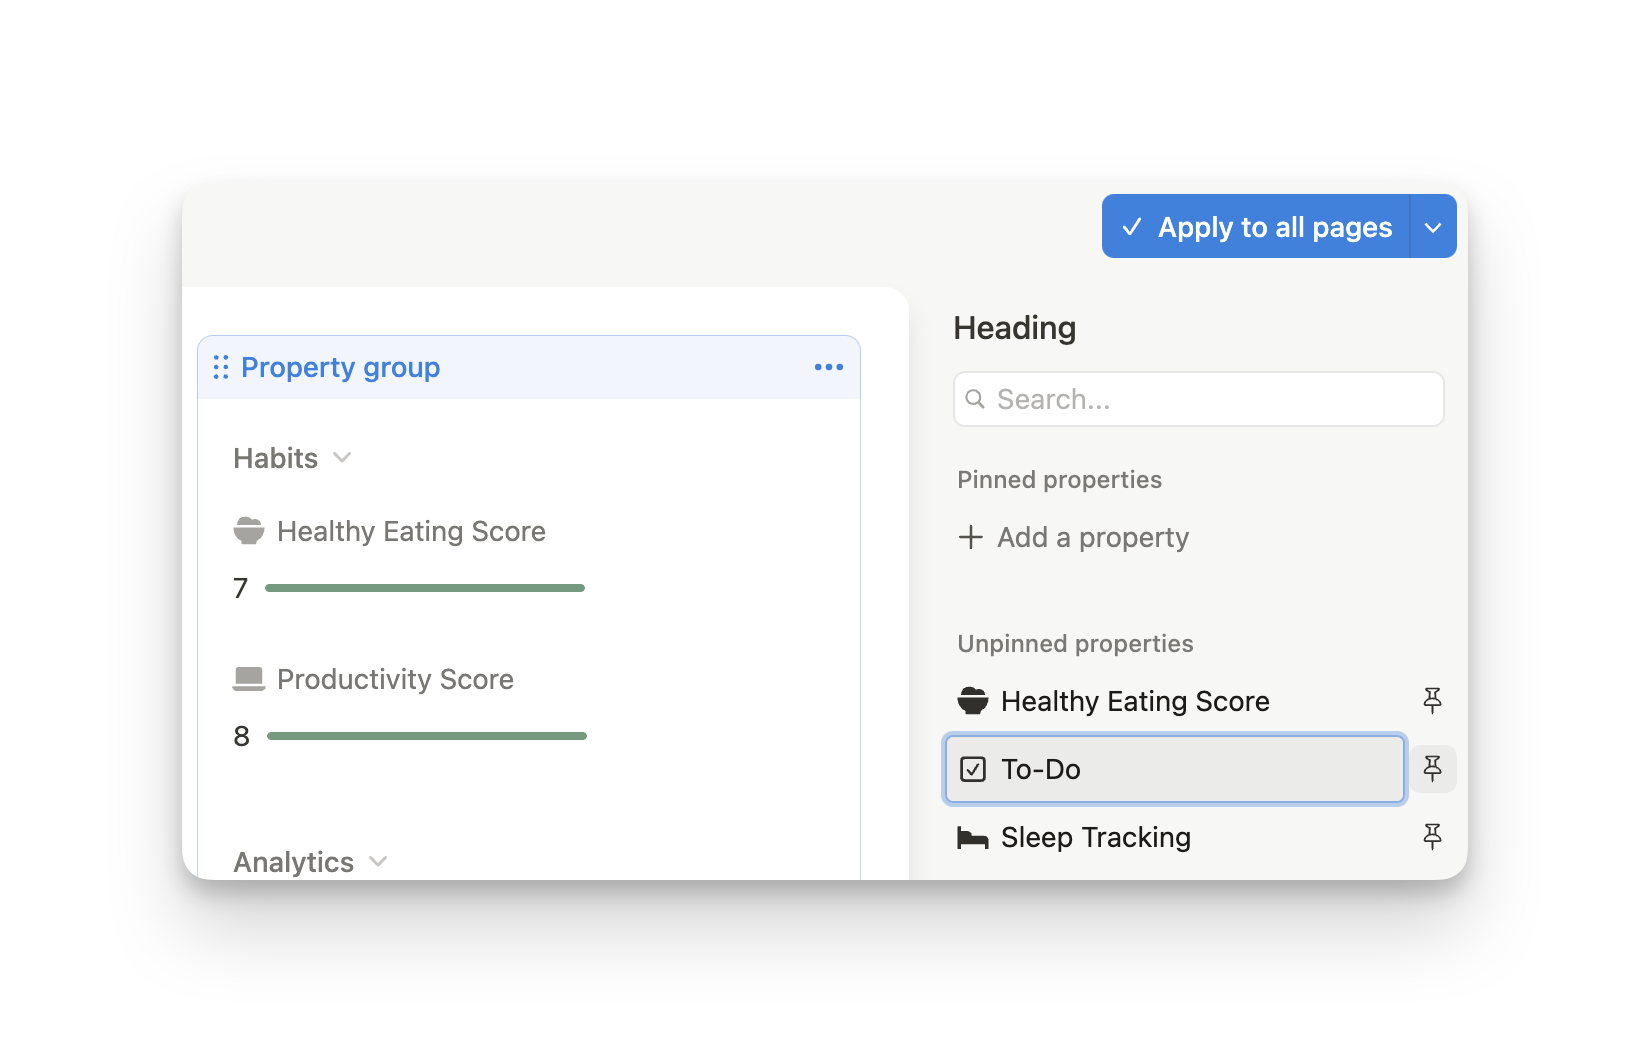
Pinning important properties to the header is a great way to keep essential information front and center. Here’s how:
- Access the Header: Click on the header area of your Layout.
- View All Properties: On the right side of the page, you’ll see a list of all available properties.
- Pin Properties: Locate the property you want to pin (like Status, Priority, or Due Date) and click on the pin icon next to it. This action moves the property to the header, ensuring it’s prominently displayed and easily accessible at the top of the page.
This method is ideal for properties that need immediate visibility, helping you avoid the need to scroll or search for key information.
5.2 Categorize Properties in Property Groups
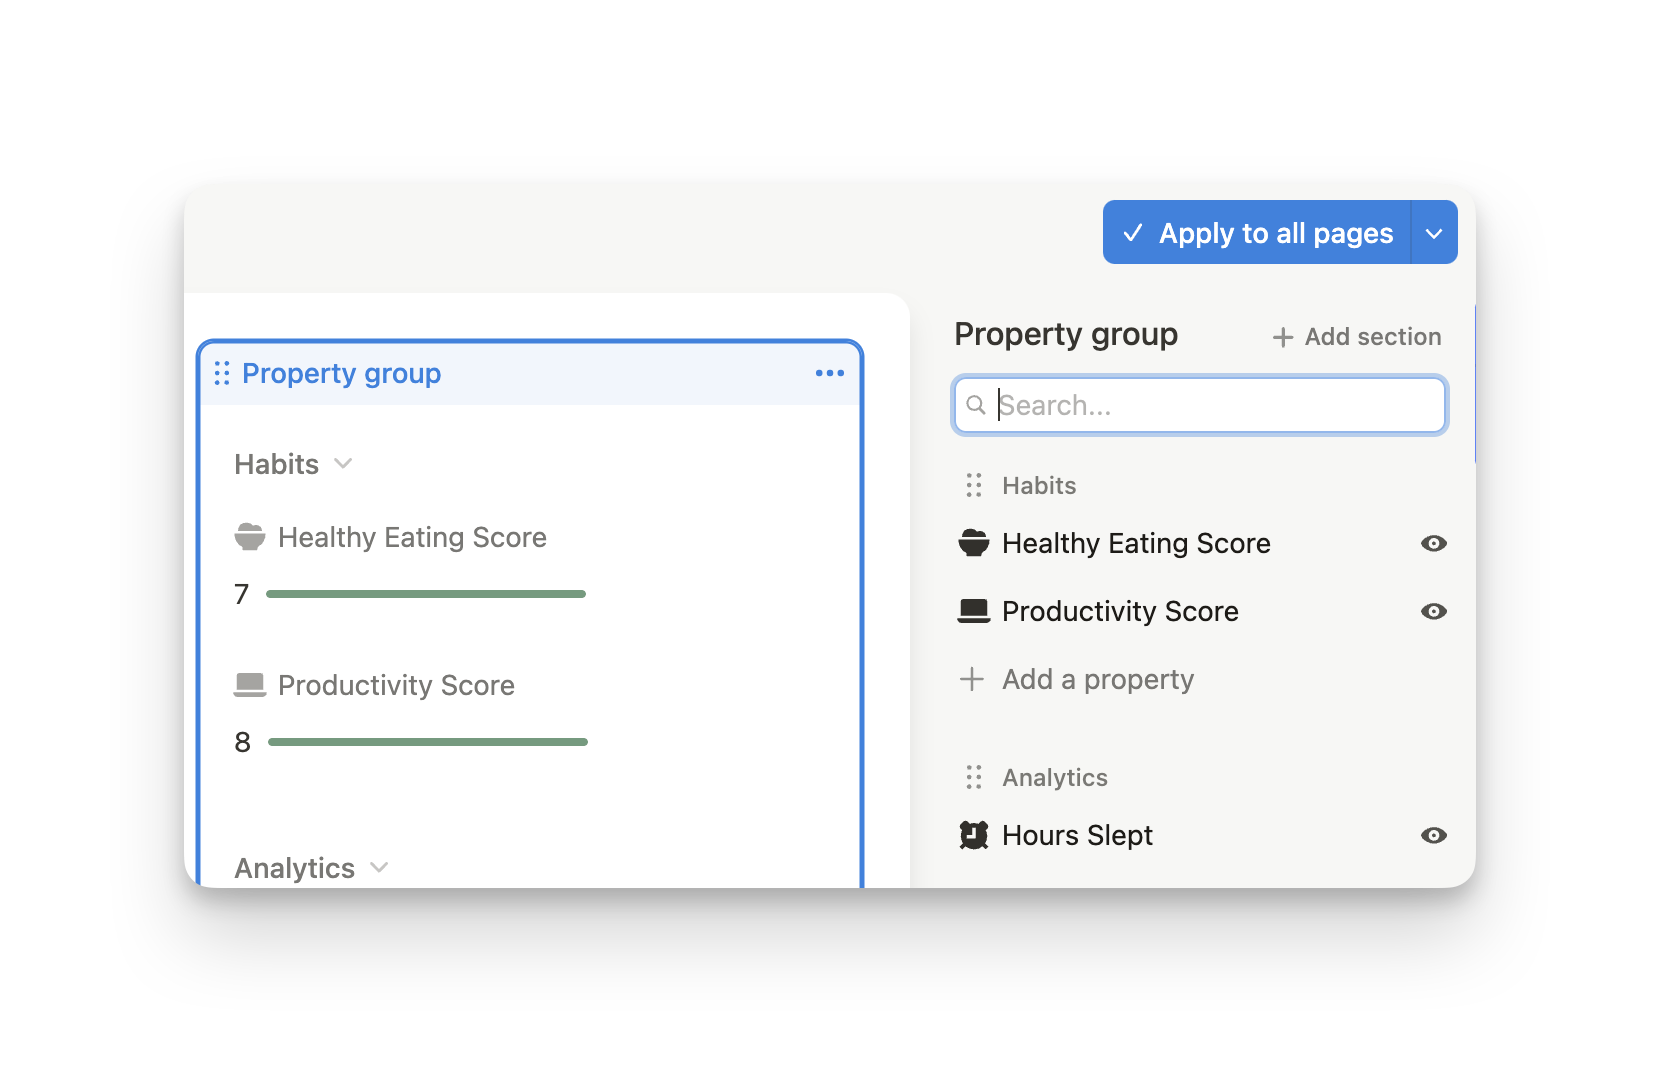
Property Groups let you arrange properties into organized sections, making it easier to keep related information together. Here’s how to customize your Property Group:
- Select the Property Group Module: Click on the Property Group area in your Layout.
- Manage Properties: On the right side, you’ll see a list of all properties within the group. You can rearrange properties by dragging and dropping them into your desired order.
- Create Categories: To organize properties further, create sections within the Property Group by dragging them into different sub-sections or categories. For instance, you could create sections like Task Details, Deadlines, and Owner Info to provide a logical grouping that simplifies data navigation.
This approach allows you to present properties in an organized manner, improving readability and making it easier to locate specific information.
5.3 Create New Modules from Properties
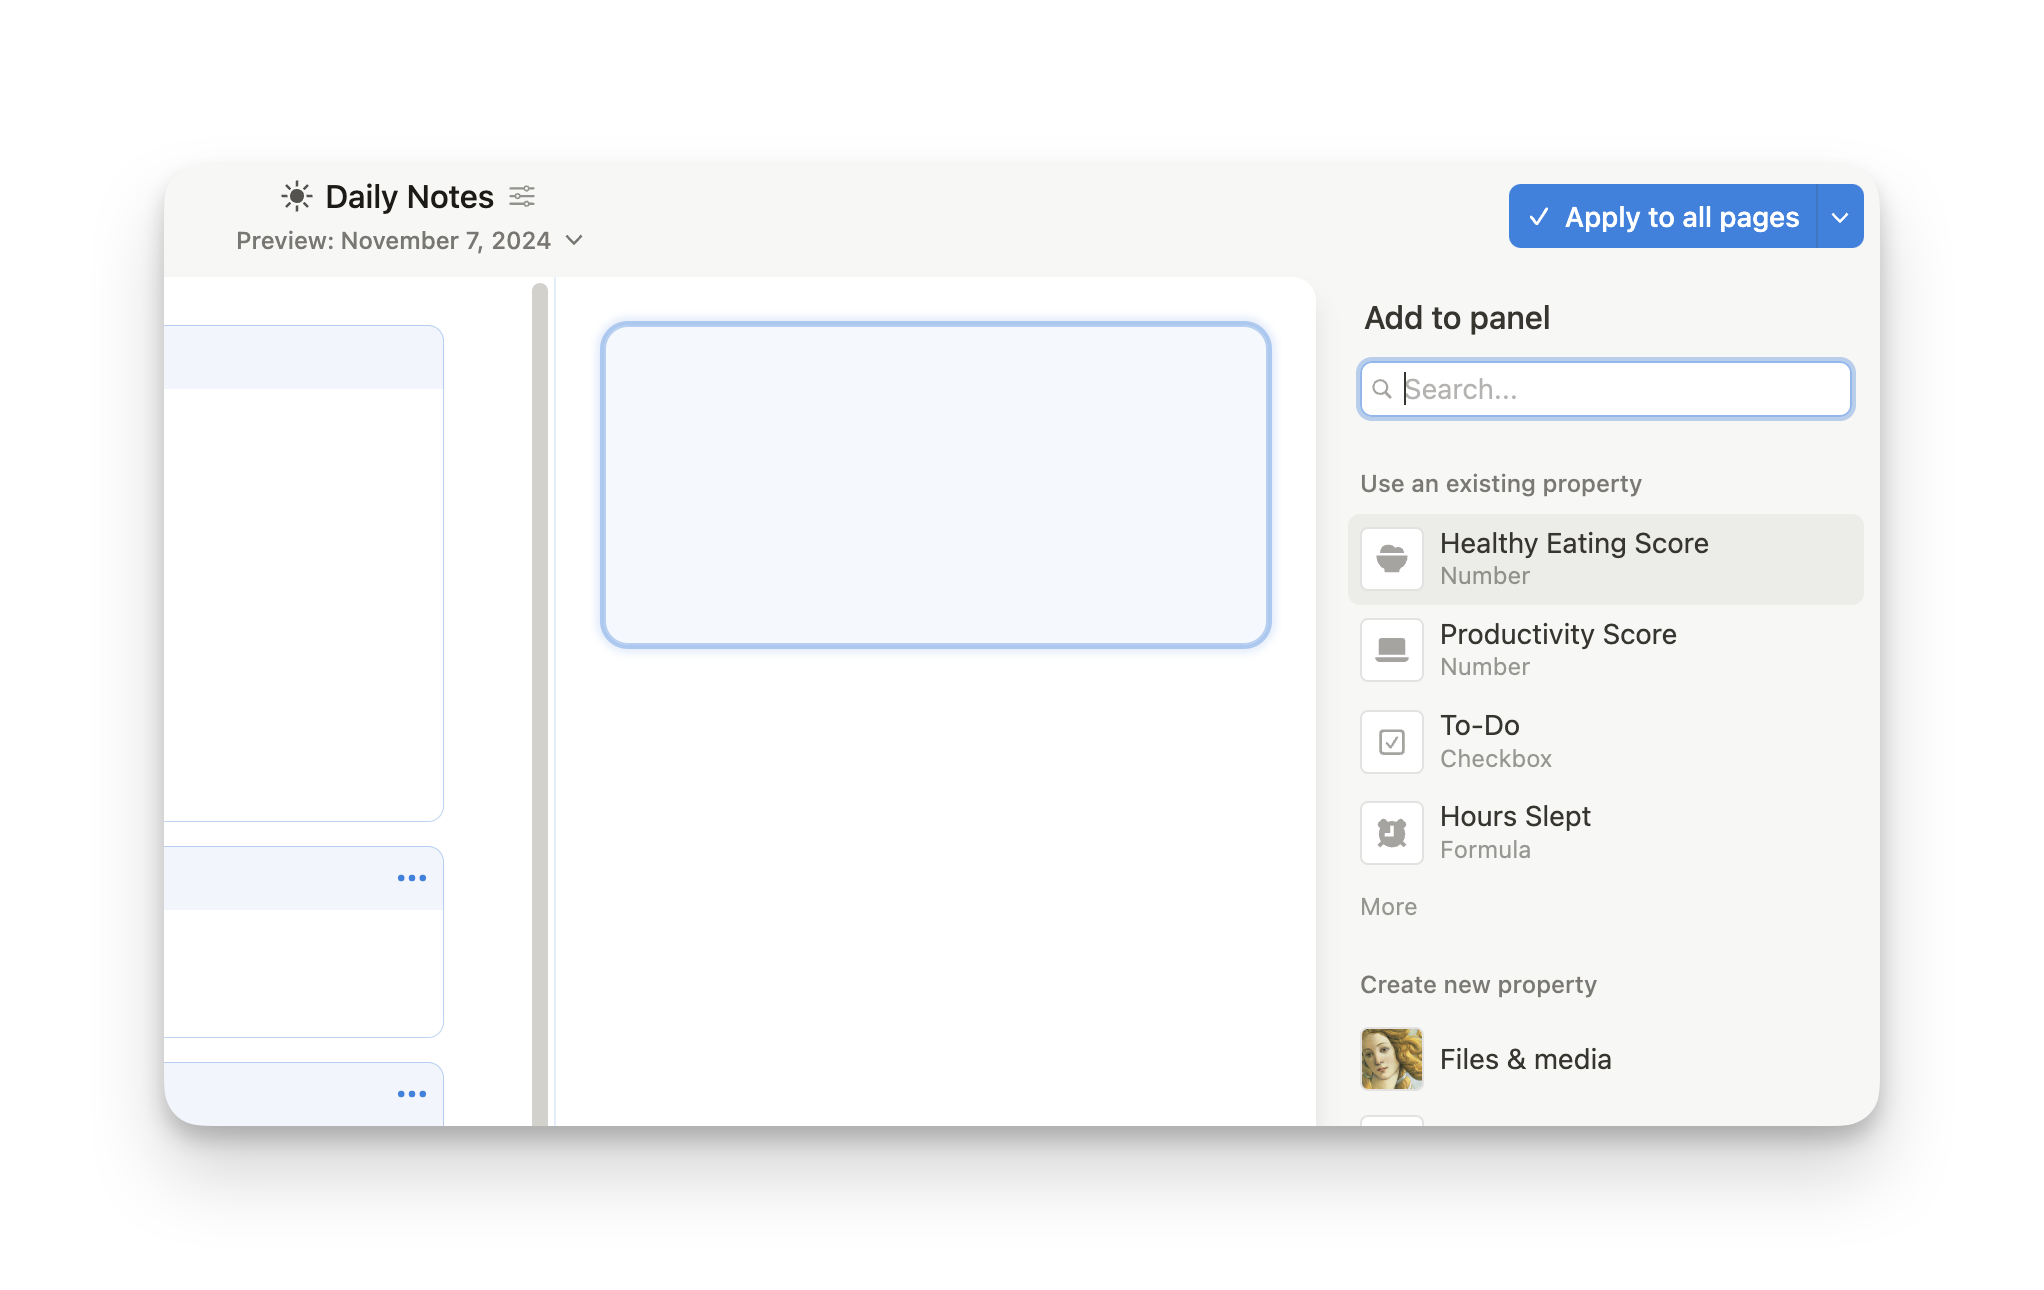
Adding new properties or modules within Layouts is straightforward and can be done in two main areas:
- Use the Plus Icon: You’ll find a plus (+) icon both below the header and in the panel area.
- Add Existing or New Properties: Click the plus icon to add an existing property from your database or create a new one specifically for this layout. For example, you could add a “Review Status” field to track the entry’s approval stage or a “Notes” section for supplementary information.
Creating new modules or adding properties on the go helps you tailor each entry to meet the specific requirements of your project or workflow.
5.4 Move Modules to the Panel
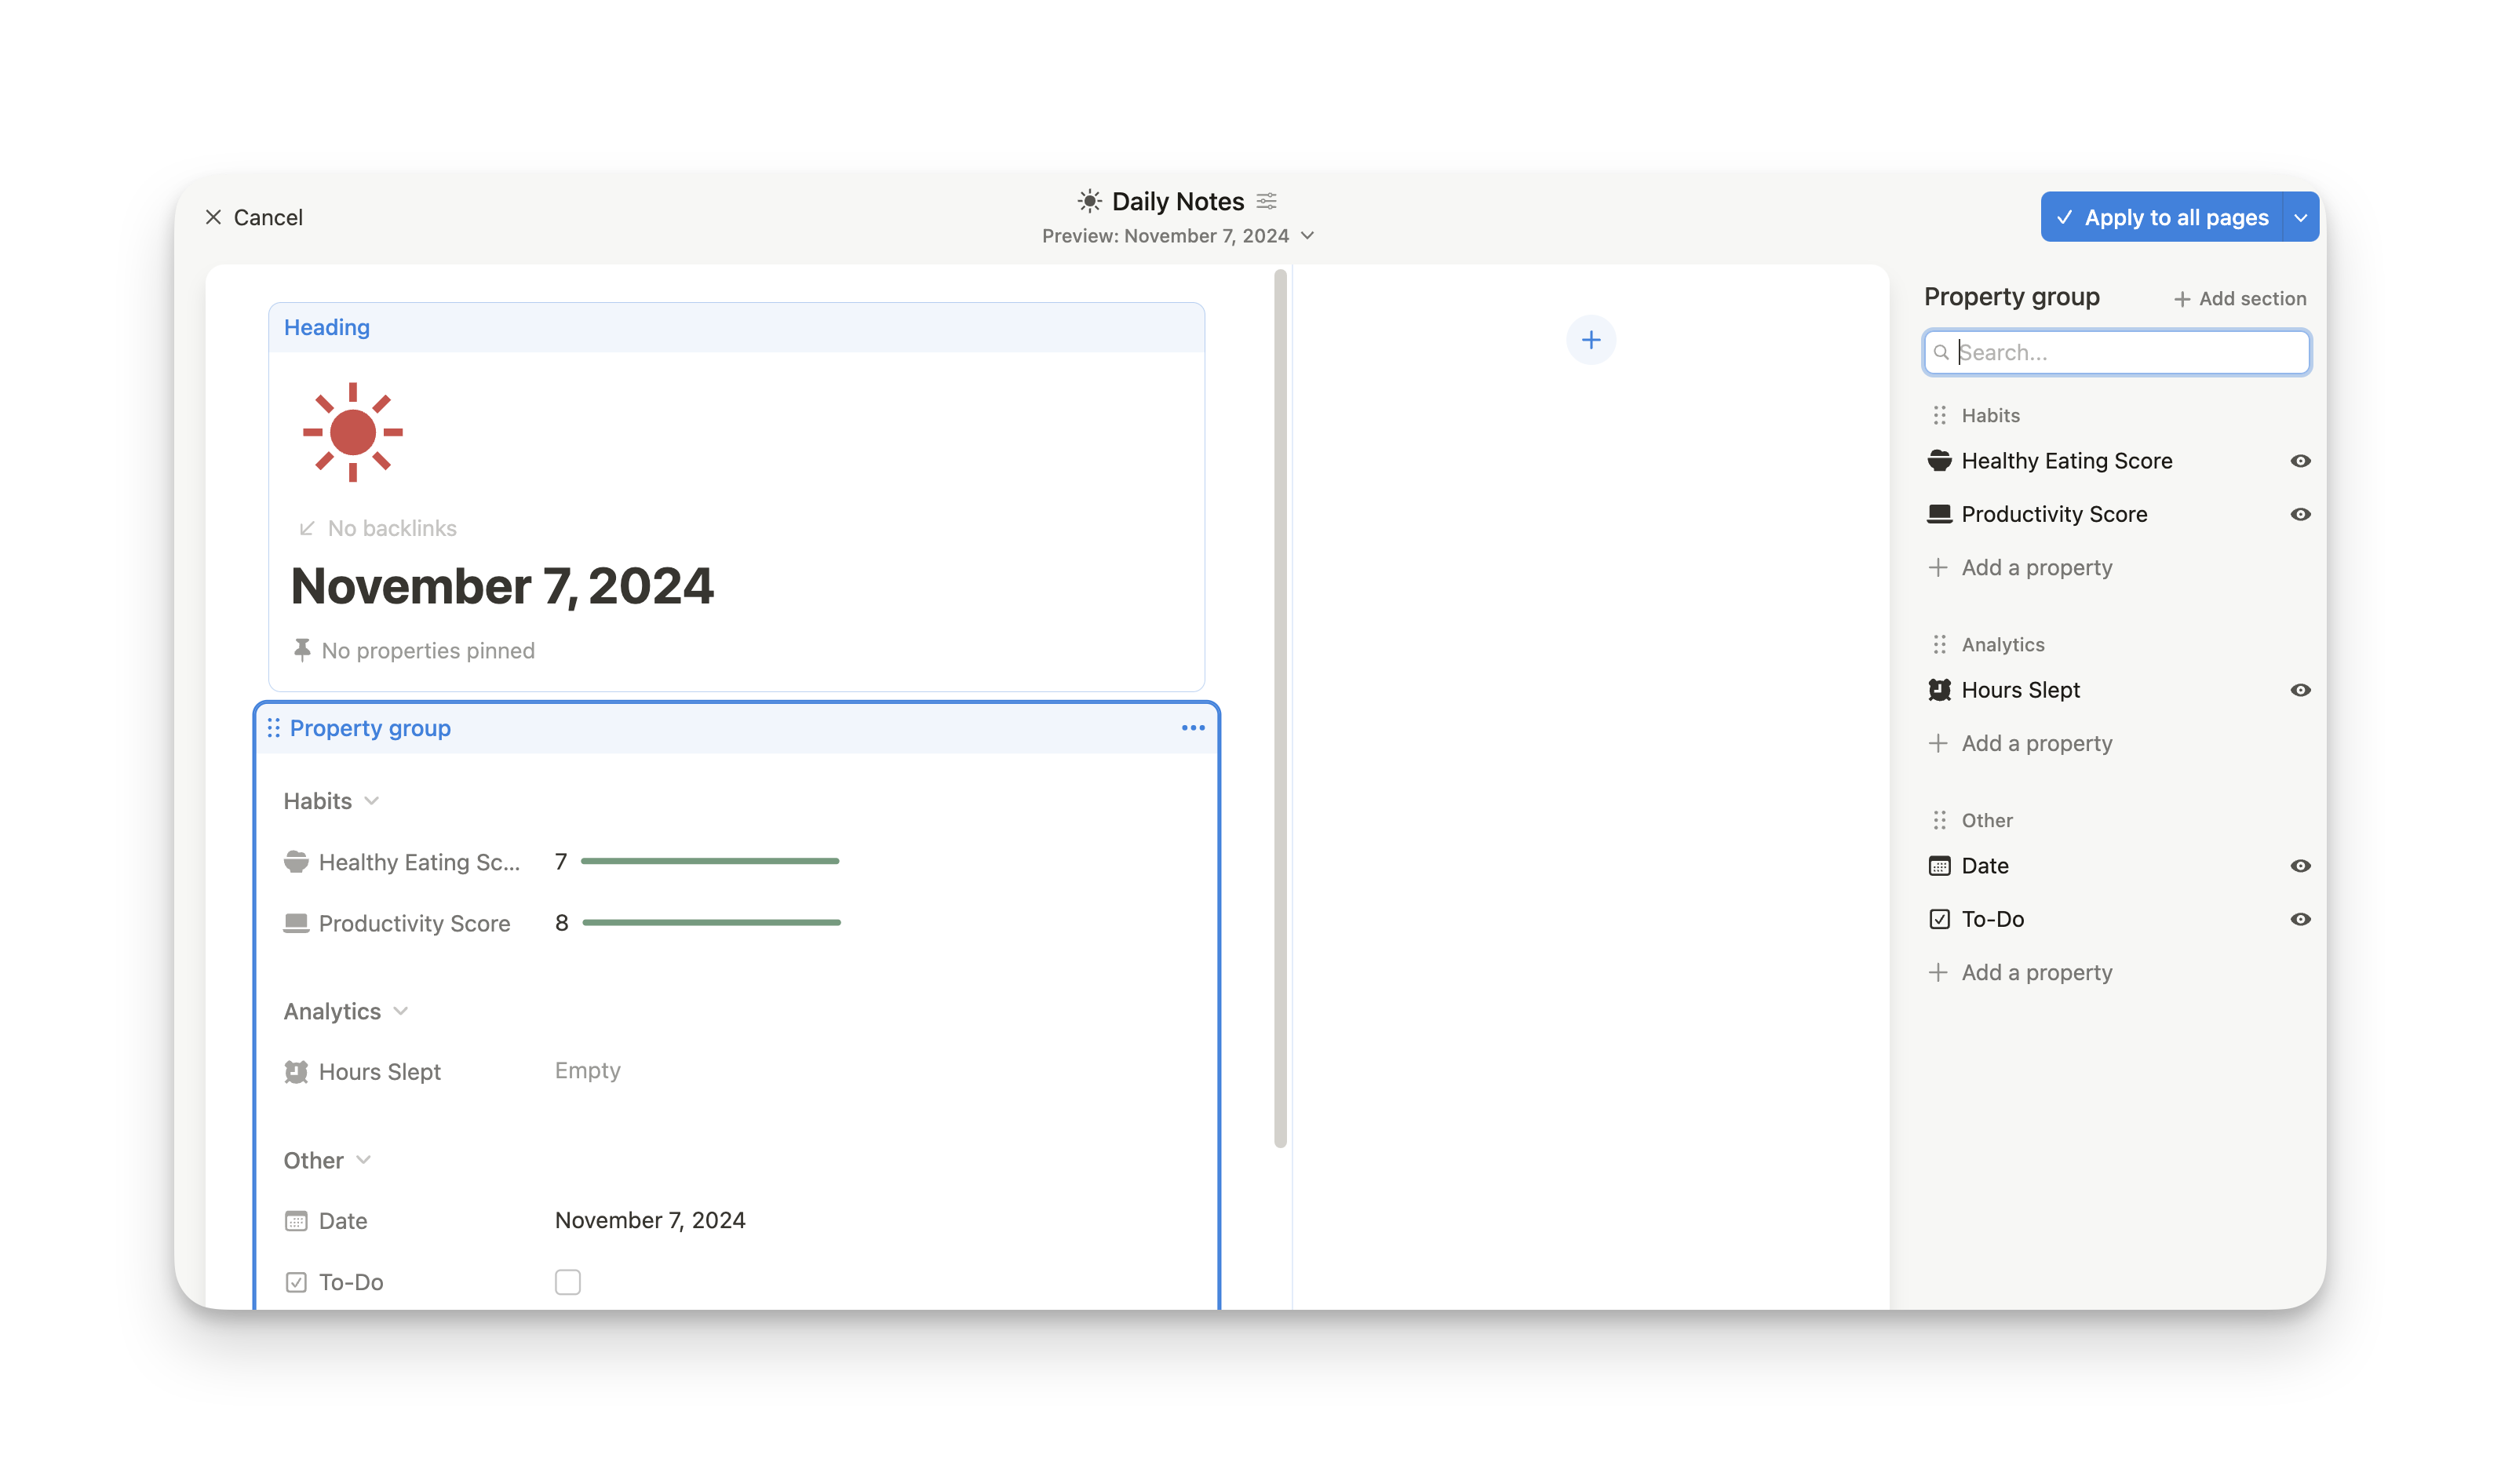
Layouts provide flexibility in arranging your modules for an optimal page structure. Here’s how you can manage your modules:
- Reorder Modules: Every module (except the header) can be easily moved around. Simply click and drag any module to rearrange the order within the main page area.
- Drag Modules to the Panel: Modules can be moved between the main content area and the Panel. To hide a module in the Panel, simply drag it from below the header area and drop it into the Panel section. This will store it as a collapsible sidebar item, hidden but accessible when needed.
This freedom of movement allows you to create a streamlined and functional layout, adjusting the position of modules according to their relevance and visibility requirements.
6. Frequently Asked Questions
Can I set a different layout for database entries?
No, right now once you’ve customized a layout, you can only apply it as the default for all entries in the database.
Are layout settings visible to all users?
Yes, layout changes are visible to everyone with access to the database.
Can I revert to Notion’s default view?
Yes, you can reset the layout by going back into Layout settings and choosing default options.
7. Conclusion
Notion’s Layouts feature is a powerful way to customize database entries, making it easy to organize content with modules, categorized properties, and collapsible panels. Whether you’re managing a large project or tracking client data, Layouts can improve clarity and usability, providing a tailored experience suited to your unique needs. Take advantage of these tools to keep your workspace visually streamlined and optimized for productivity.
